How to Add a Linked Server
-
Posted on November 21, 2010 by Derek Dieter
-
6
Adding a Linked server can be done by either using the GUI interface or the sp_addlinkedserver command.
Adding a linked Server using the GUI
There are two ways to add another SQL Server as a linked server. Using the first method, you need to specify the actual server name as the “linked server name”. What this means is that everytime you want to reference the linked server in code, you will use the remote server’s name. This may not be beneficial because if the linked server’s name changes, then you will have to also change all the code that references the linked server. I like to avoid this method even though it is easier to initially setup. The rest of the steps will guide you through setting up a linked server with a custom name:
To add a linked server using SSMS (SQL Server Management Studio), open the server you want to create a link from in object explorer.
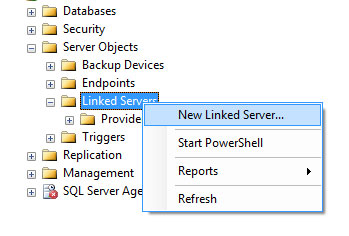
- In SSMS, Expand Server Objects -> Linked Servers -> (Right click on the Linked Server Folder and select “New Linked Server”)
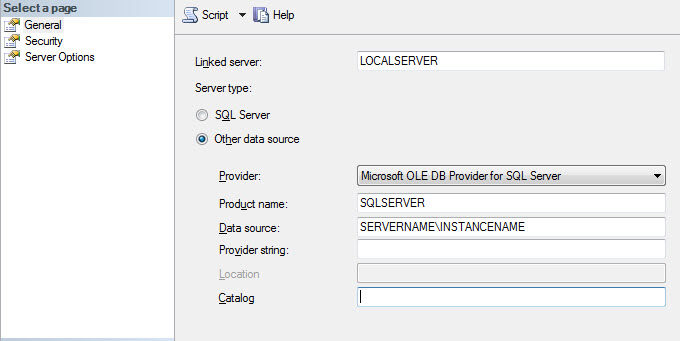
- The “New Linked Server” Dialog appears. (see below).
- For “Server Type” make sure “Other Data Source” is selected. (The SQL Server option will force you to specify the literal SQL Server Name)
- Type in a friendly name that describes your linked server (without spaces). I use AccountingServer.
- Provider – Select “Microsoft OLE DB Provider for SQL Server”
- Product Name – type: SQLSERVER (with no spaces)
- Datasource – type the actual server name, and instance name using this convention: SERVERNAMEINSTANCENAME
- ProviderString – Blank
- Catalog – Optional (If entered use the default database you will be using)
- Prior to exiting, continue to the next section (defining security)

Add New Linked Server

Linked Server Settings
Define the Linked Server Security
Linked server security can be defined a few different ways. The different security methods are outlined below. The first three options are the most common:
| Option Name | Description |
| Be made using the login’s current security context | Most Secure. Uses integrated authentication, specifically Kerberos delegation to pass the credentials of the current login executing the request to the linked server. The remote server must also have the login defined. This requires establishing Kerberos Constrained Delegation in Active Directory, unless the linked server is another instance on the same Server. If instance is on the same server and the logins have the appropriate permissions, I recommend this one. |
| Be made using this security context | Less Secure. Uses SQL Server Authentication to log in to the linked server. The credentials are used every time a call is made. |
| Local server login to remote server login mappings | You can specify multiple SQL Server logins to use based upon the context of the user that is making the call. So if you have George executing a select statement, you can have him execute as a different user’s login when linking to the linked server. This will allow you to not need to define “George” on the linked server. |
| Not be made | If a mapping is not defined, and/or the local login does not have a mapping, do not connect to the linked server. |
| Be made without using a security context | Connect to the server without any credentials. I do not see a use for this unless you have security defined as public. |
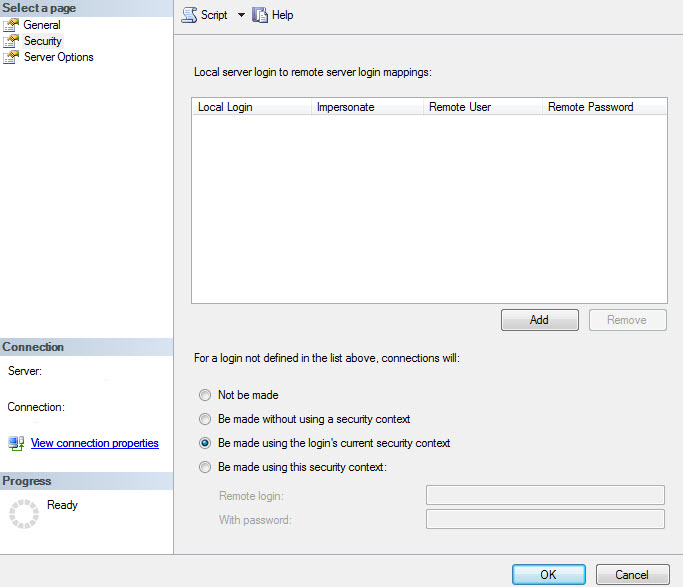
- Within the same Dialog on the left menu under “Select a Page”, select Security
- Enter the security option of your choice.
- Click OK, and the new linked server is created

Linked Server Security Settings
- Comments (RSS)
- Trackback
- Permalink
I try not working, no db or table from the other server.
Could anyone help…..
Каталог сайтов AddsSites c бесплатной регистрацией, прямыми ссылками и индивидуальными страницами, оптимизированными для каждого добавленного ресурса. Статистика апдейтов и информеры тИЦ и PR, Whois по домену и IP – адресу. Сервисы анализа сайтов и автоматической регистрации в каталогах.
I used your method for many years, but I now find it does not work with Windows Server 2012 R2 and SQL Server 2014. No matter what changes I make, I continually get a Server is not found or is not accessible error.( Error 53). If I choose the SQL Server option and choose an actual server name for the Linked Server name, there is no problem. But I cannot choose my own name for it. Thanks for the article. I was a lot of help for years.

